Showing posts with label resin. Show all posts

Tuesday, May 12, 2015

Our old table is new again!


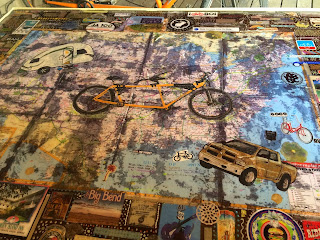
We wanted to do something with our everyday dining table. At first I thought I would paint a design on it with those new chalk paints I've been hearing about. Then my husband and I got the idea to glue a map that shows all of our travels onto the table and add collage elements around it then pour resin on top to seal it all.
This photo shows the first attempt of trying to glue down the map. I used a whole jar of acrylic gel medium and it had some horrible wrinkles I couldn't even get out. I carefully took it off before it was dry. The photo shows were parts of the map stuck. I poured water on the table and used a credit card to scratch it all off. 

The map sat around for a week while I gained courage to start over and  got some helpful hints from my friend Marianne and the internet. I tore the map apart on its creases and crinkled up each section to make overall wrinkles and coated the front and back of each section. 

It came out perfect this go around.

After I glued down the pieces, I added dots and swirls of paint between the ephemera. 
The next steps were to put masking tape around all the edges and then pour a coat of 2 part resin. Unfortunately the resin soaked through the map making dark mottled areas where the paper was thinner from it sticking to the table the first go around.  Now what to do?

I decided to start painting on the resin.
I painted our tandem bike.
I really liked the way it turned out so I painted some more...
Next I added our teardrop R-Pod trailer complete with
our little pink and blue trailer shoes under the door. 

Next I added our  Dodge Ram Pickup truck we had to buy to pull the trailer, then the second coat of resin was added. We thought it still needed more "stuff" so my husband and I decided to add some current travel photos to the mix...
In total there are 3 layers of resin. I waited until it was dry to the touch to add the second and third layers. After letting it cure for 72 hours, we removed the tape and had to do a light sanding around the edges as the resin had tried to creep up the tape. I didn't have the resin pour off the sides. The table top is 3' x 4'. I have ordered some silicon place mats so we don't scratch it up or cause any damage since it is a table we use every day. 

Wednesday, February 13, 2013

Foothills Ride


 This story starts with my husband sending out an email to all of his friends telling them they should bid on my bike piece that went to the World Bicycle Relief Auction. After I got home from the auction one of his friends called me and asked if the piece sold and I said yes. Next question was could I recreate that piece but with a different color scheme and larger. I said yes and we decided on 3 x 4 feet.

I went up into the foothills on my bike and took this picture of the hills but the sky was grey and our friend wanted a sunset, so I tried to paint one from memory and hated it. 

I went to visit my daughter in Denver and as we were leaving the shopping mall , I saw one of the prettiest sunsets I had ever seen and snapped a photo with my phone and then painted from that layered over the original sky.

The next step was to design the bike. These tubes that I had were too big in relationship to the  "wheels" 

 Oxide Cycles in Boise is a new start up making their own steel bikes. I went to Alan at the shop and asked him what his thoughts were.  


Wow, was I ever lucky. He had some tubing the correct size and said he could weld me a mini bike frame.

I had another friend Innes, build me a custom hand rubbed oiled red oak frame that is a work of art in and of itself. He put it into the frame for me and even made a wood backing to make it more secure.

Here is the finished piece. After screwing the wheels into the masonite backing I poured 2 part resin all over the whole piece and held my breath and it came out great! And now it is off to it's new home tonight. 

Monday, January 7, 2013

Beer, Babes and Bikes


Finding the parts

adding more
final steps were "antiquing" the pieces, gluing them down and pouring resin on top. 
I had a really fun project this past month. A woman contacted me that had seen my work around town and wondered if I would do a personalized custom piece for her to give to her boyfriend for Christmas. She told me all the things she could think of that characterized him in the way she knew him. During this process I figured out that I knew who he was. (Not a close friend but had met him a few times) She was going to gather ticket stubs etc and give them to me (this was before Thanksgiving) When I had not heard from her by the time I got back from NY, I decided to contact her and yes, she still wanted me to make the piece but no, she had not collected anything. No problem... I went shopping in my studio and came up with all the pieces, then had her come approve before anything was glued down. She loved it! The only thing she wanted me to add was a squirrel. (Which I happend to have!) I did have to sacrifice an earring for one of the items she requested-Tinkerbell.  So after it was all approved, I glued and painted and then poured resin over everything. We both loved the way it turned out! Now to find out if he did!

Sunday, June 17, 2012

Every Heart has a Silver Lining


 The upcoming TVAA member show is titled "Silver Linings" After visiting my friend Rebecca in CA last month, I had the perfect idea.  First I gathered everything I could find in my studio that was silver.


I already had this wooden 10" x 24" wooden piece that I purchased several years ago from an antique store for way more than I would normally spend on a substrate and then had no idea what I would do with it!  It seemed kind of country and outdated,  but no more... It would be getting a facelift!


I taped off the edges.  I collaged the frame. I glued all the silver pieces in between the hearts. The heart that was hand-made by Rebecca, (which I added some watercolor details) I glued to the top of a wooden heart.  After all the glue was dried I poured 2 part resin over all of the silver pieces and it turned out well, now that I'm not afraid of resin!

We can enter up to 3 pieces...I'm working on the next piece for the show with an abandoned  birds nest I found.

Sunday, June 10, 2012

Working with Joint compound, Wax and Resin


 I found this old wooden tray from California that was split on the sides at a thrift store. I used wood glue and a C clamp to fix it. I then taped it off and spread a thin layer of joint compound over the tape and let it dry.

 I then added water colors and let that soak into the compound.


 Next I pulled of the tape and added a thin layer of wax.


 I scratched into the wax and rubbed brown paint into the scratch marks.


The last step was to pour resin over the entire piece. This took me several months to do this step as I was afraid to ruin it but after getting over my fear of resin on the last project, I have been on a resin frenzy.  I really like the way it turned out, I may keep one this for myself.

Friday, June 8, 2012

Lauren's Piece

original screen door from previous owners
A fellow artist and friend, Lauren asked me a few months back if I do any trades for my art and I said sure. Well she had a really neat idea for what she wanted. She lives in an old house with a nice big garden and wanted to be able to remember and commemorate the place when she moves. The really cool part was that she had all these artifacts that she found while digging in the yard...a pair of scissors, marbles, a bullet casing, a donkey pin, a glass bottle, a shard of pottery, some nails, a key and even a dried praying mantis.

little footprints in the back cement
 She was having a garage sale when I went by to check things out and I took this frame. I painted it in her two favorite colors. Then I printed and cut up the photos of the door screen and child's footprints and made a photo collage of the two images. I then glued down all the pieces, added brown dots for more detail and let it dry overnight.

 This was the part I was dreading because there is little room for error and if I didn't mix the resin correctly it woudn't cure and the piece would be sticky forever and her artifacts would be ruined.
I finally gained the courage and went for it. I remembered not too be stingy about mixing it thoroughly and pouring equal amount of each in separate containers then pouring both of those into a third cup, stirring, then pour that mixture into a fourth and stirring again. If you take the time to do it properly- it really does turn out well! yeah! If you get small air bubbles you blow on them without breathing the fumes and the carbon dioxide in your breath breaks them up.

Lauren's Piece
Lauren and I are both happy with the results! A happy little piece to commemorate this, my 300th blog entry!

Saturday, November 19, 2011

Antlers Change Direction

In my original piece of art using these antlers I made this Antler Mirror- Objects from my travels put together. The mirror was bought at a thrift shop from a trip to CA last year. The old bottle was from weird place in VA that I will be blogging about (my husband and I still have nightmares from this place)  and the antlers were obtained from my mom's garage in TX. (No one knows were they came from or how they got there) But that piece is no longer available as I took it apart to make something else. Why did I take it apart, well I had it outside and the antlers were glued and well...lets just say the antlers are too heavy for glue. Luckily nothing broke, just came apart.

The new incarnation of the antlers started with the handmade wooden box I found in a shopping cart in front of a thrift store marked "free" those are the best finds! It is a well made box, not flimsy. The rectangular pieces in the middle are small encaustic paintings that I made in a workshop last year. I really do need to go back to one of those classes as I have used up all but one of my wax painting/collages in an assemblage!

This time around the antlers are not only glued but also screwed into the wood. They are not coming off this time! Placed around the encaustics are river rocks given to me from a friend that brought them back from New Zealand for me.

The last step was I poured two part resin over all the rocks to seal everything in and the rocks appear to be under a layer of water.

I really like the simplicity and natural colors of this piece. I don't have a name for it yet. I'm taking suggestions. This piece is for sale $250.