Saturday, June 30, 2012

Fixing my old tattoos

These are the existing tattoos that are on my back. They are approx. 17 years old and not very great. The one on the right (the darker one) was the first one. I got this on 6th Street. in Austin TX. I wanted one that I had drawn but to get all the detail the tattoo artist said it would be HUGE and I wasn't ready for that at that time. As these things tend to be now or never and I wanted to get it that day,  I thumbed through their book and picked out the flower. The round one was done a year or two later in sketchy part of Dallas near where I lived that has since been torn down and a Super Target was built on the grounds. This one was a Japanese Crest. It was 1997 and the year of Japanese art in the Dallas Public Schools.

 This is a sketch of how to combine the two existing tattoos into a coherent scene. I would get a second Japanese crest and the two of them would form the bicycle wheels.  The foreground would be in color and the background in black and gray. Two of my friends and I are planning on going in August and getting our tattoos all done at the same time and then going out for drinks (or going home for ice packs.) When I showed the guy the plan, he said "wait, let me guess, this fits your back exactly."and Marianne said, "well, she is an artist' I also designed her tattoo which is a dragonfly. He seemed a little sad as he said designing the tattoo is part of what we are paying him for!

Here is a photo of the bike I want in the scene. (April 2012, St. George, Utah)


Thursday, June 21, 2012

Our Lady of ...

"Our Lady of ...."  Found Object Assemblage 6" x 7" x 3 1/2" This is my third entry for the TVAA show Silver Linings   
This one started with a gold garage sale frame which I painted over with silver ink. It looks way better than it did!
Next was this wooden box from a garage sale lined with silver papers that Rebeca gave me. I also gave it a thin coating (wash) of the silver ink
Actually I should have said the piece started with this little box, which I had 1/2 way completed but did not know what to do with. I am sure it has been in my studio for a year now asking to be used in something.
Side view, I think it is a freebie wooden jewelry box that back in the day your ring or necklace purchase would have come in  instead of a cardboard or plastic box.
I have a collection of small glass jars with cork tops. I added silver glitter to it and glued it to a lug nut I found in the street for height.
Not sure what this was for, looks like a place holder but there is no place to put a card in it.
close up of interior

The fun part was layering all the parts to add depth to the piece.
So back to the name. I have already entered the show and named it Our Lady of Silver Linings, but now I am having second thoughts that this piece should be something like a patron saint of arts and crafters who like to use lots of glitter, so some other names could be Our Lady of Glitter, Our Lady of Shiny Things....What do you think?

Wednesday, June 20, 2012

Should I Stay or Should I Go?

Should I Stay or Should I Go? 12" x 10" x 7"
Found Object Assemblage


This found object assemblage started with the birds nest I found 2 weekends ago in the tall grass at the base of Soldier Mountain Ski Resort. It is very well built and appears to have blown off a building ledge as there was a little bit of dried paint stuck to the bottom.

I was thinking about the upcoming TVAA Silver Linings Show and how I could weave bits of silver things into the lining of the nest.

Now what to do with the nest with the silver lining....hmm...I tried lots of different ideas such as putting it into a birdhouse (too big) I had all these elaborate bases with silver fringe etc. but then the  simplest stand looked the best. This appears to be some kind of serving dish holder. I found this in a box marked "free" outside the Greek Orthodox Church Garage Sale last year. Any of you that read my blog on a regular basis would have to know my husband wasn't with me that day!

The finishing touch was a retro gold bird I had that was my Aunt Mary's. I like the contrast of the gold and silver and how the little bird is not sure if she would be comfortable in a nest of a different color. What do you think?

Sunday, June 17, 2012

Every Heart has a Silver Lining


 The upcoming TVAA member show is titled "Silver Linings" After visiting my friend Rebecca in CA last month, I had the perfect idea.  First I gathered everything I could find in my studio that was silver.


I already had this wooden 10" x 24" wooden piece that I purchased several years ago from an antique store for way more than I would normally spend on a substrate and then had no idea what I would do with it!  It seemed kind of country and outdated,  but no more... It would be getting a facelift!


I taped off the edges.  I collaged the frame. I glued all the silver pieces in between the hearts. The heart that was hand-made by Rebecca, (which I added some watercolor details) I glued to the top of a wooden heart.  After all the glue was dried I poured 2 part resin over all of the silver pieces and it turned out well, now that I'm not afraid of resin!

We can enter up to 3 pieces...I'm working on the next piece for the show with an abandoned  birds nest I found.

Sunday, June 10, 2012

Working with Joint compound, Wax and Resin


 I found this old wooden tray from California that was split on the sides at a thrift store. I used wood glue and a C clamp to fix it. I then taped it off and spread a thin layer of joint compound over the tape and let it dry.

 I then added water colors and let that soak into the compound.


 Next I pulled of the tape and added a thin layer of wax.


 I scratched into the wax and rubbed brown paint into the scratch marks.


The last step was to pour resin over the entire piece. This took me several months to do this step as I was afraid to ruin it but after getting over my fear of resin on the last project, I have been on a resin frenzy.  I really like the way it turned out, I may keep one this for myself.

Friday, June 8, 2012

Lauren's Piece

original screen door from previous owners
A fellow artist and friend, Lauren asked me a few months back if I do any trades for my art and I said sure. Well she had a really neat idea for what she wanted. She lives in an old house with a nice big garden and wanted to be able to remember and commemorate the place when she moves. The really cool part was that she had all these artifacts that she found while digging in the yard...a pair of scissors, marbles, a bullet casing, a donkey pin, a glass bottle, a shard of pottery, some nails, a key and even a dried praying mantis.

little footprints in the back cement
 She was having a garage sale when I went by to check things out and I took this frame. I painted it in her two favorite colors. Then I printed and cut up the photos of the door screen and child's footprints and made a photo collage of the two images. I then glued down all the pieces, added brown dots for more detail and let it dry overnight.

 This was the part I was dreading because there is little room for error and if I didn't mix the resin correctly it woudn't cure and the piece would be sticky forever and her artifacts would be ruined.
I finally gained the courage and went for it. I remembered not too be stingy about mixing it thoroughly and pouring equal amount of each in separate containers then pouring both of those into a third cup, stirring, then pour that mixture into a fourth and stirring again. If you take the time to do it properly- it really does turn out well! yeah! If you get small air bubbles you blow on them without breathing the fumes and the carbon dioxide in your breath breaks them up.

Lauren's Piece
Lauren and I are both happy with the results! A happy little piece to commemorate this, my 300th blog entry!

Saturday, June 2, 2012

Meet Me At the Center of the Earth

Getting a little help from mom
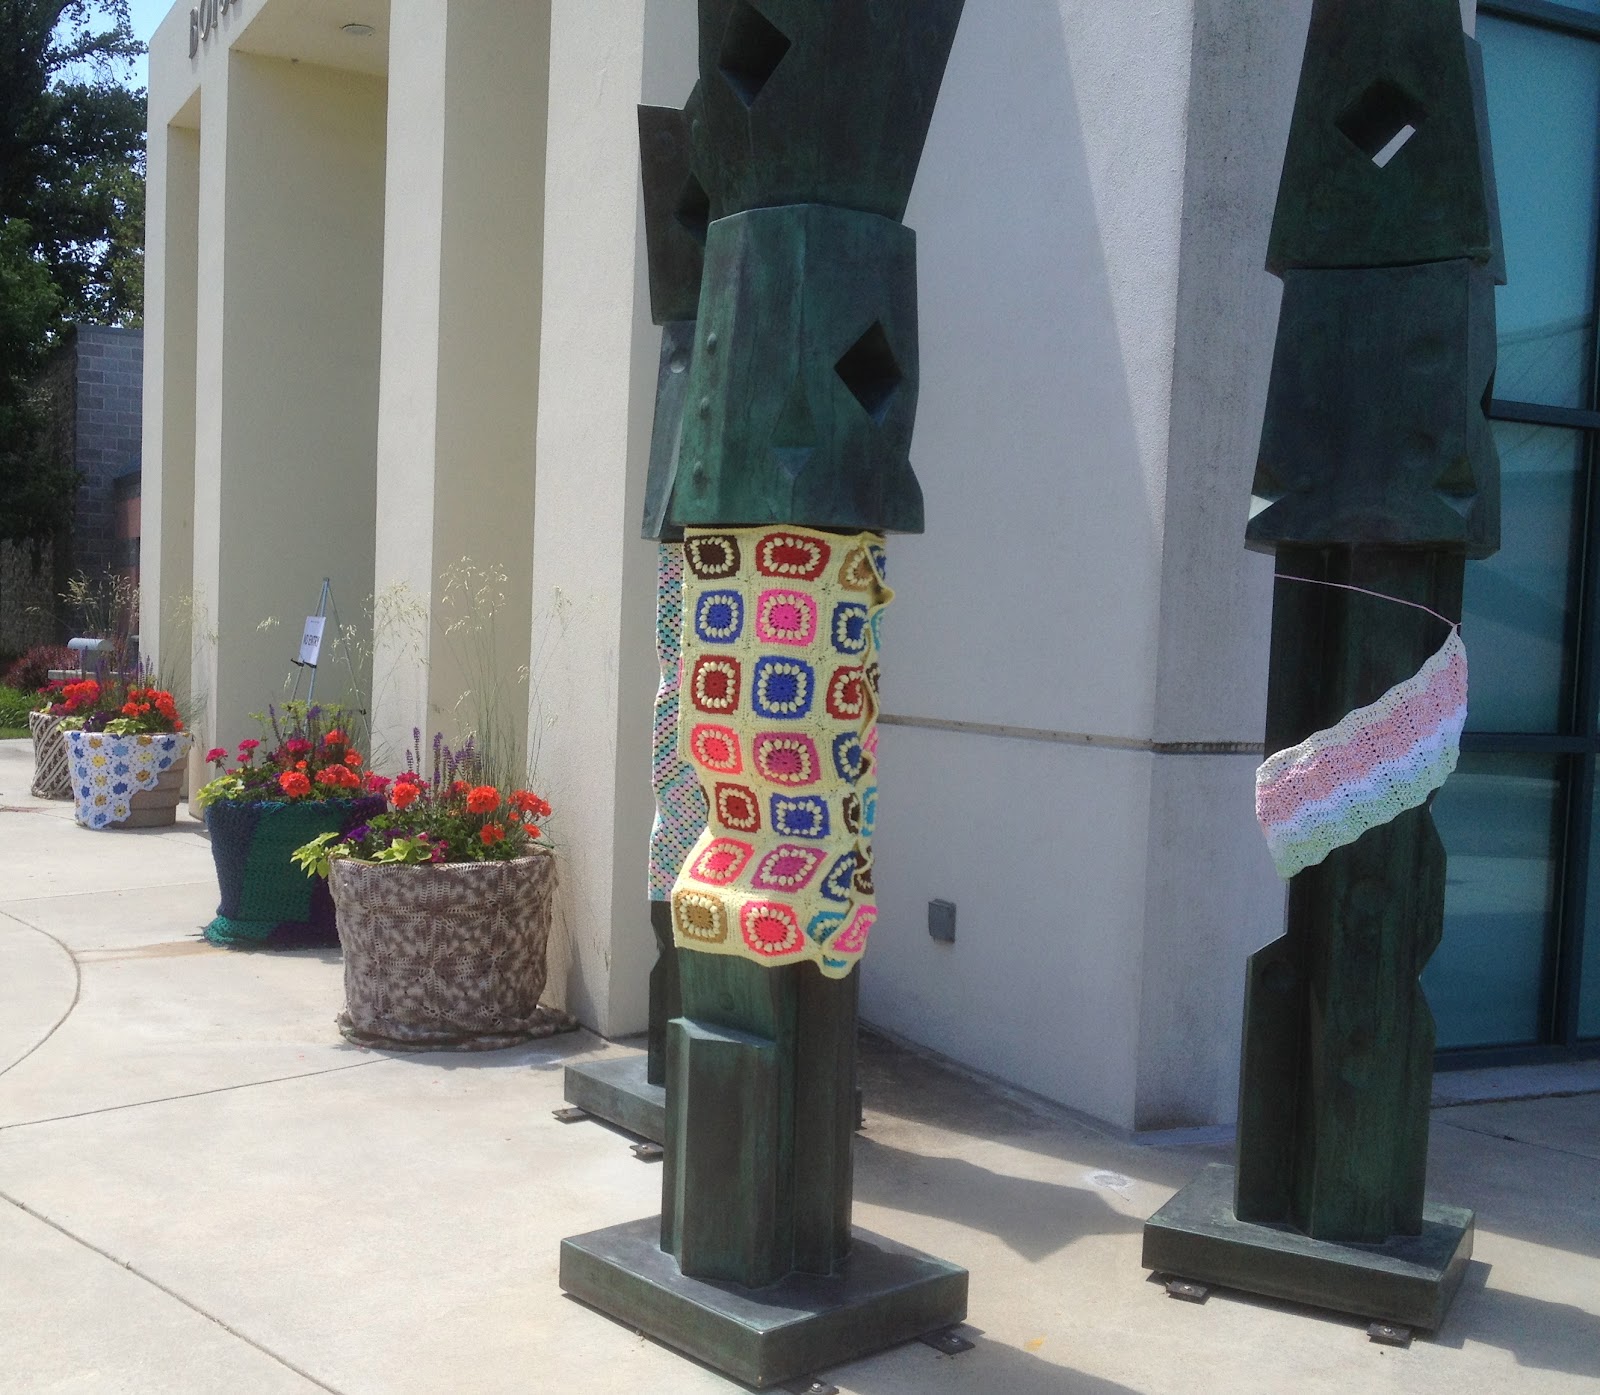
 Today  I volunteered to help at the Boise Art Museum "Yarn Bombing" for a day of community art making, my booth specialized in making god's eyes and pom poms which were hung on the fence and from quilts.  This was in conjunction with the exhibition Nick Cave: Meet Me At the Center of the Earth  exploring fashion, art, sound and movement. Everyone got to practice basic knitting techniques, get tips about using found objects in artwork, learn to stitch buttons and beads, and join artists to contribute to a collaborative community project.

Weaving in the fence

even yarn bombing on the outdoor sculptures was allowed
I added the tassel


 Local artists were invited by the museum to apply to create a "soundstick" using recycled materials based on Nick Caves Sound Suits. I was one of the artists. These soundsticks will be hung on the exterior of the museum through August 31, 2012.

The second half of the afternoon, I changed hats and was one of the artists' talking about their work using found objects for the Soundsticks.

I met some talented artists and saw and heard them talk about their soundsticks.  We were interviewed and photographed by a reporter from the Boise Weekly.


Here is a shot of my sound stick. The museum supplied the 4 foot structure, they had many different types to choose from. I picked the weathered piece of barn wood.


 I used items I found while hiking. Antlers in the Owyhees, Tin cans in Nevada. I decided to use the antlers to create a bottle tree. I had bought the bottles  (5 for a $1) at a reuse store in Bellingham, WA. The bottle tree history is that they were created to catch the bad spirits in the bottles so they would not go into your home.


 I had quite the collection of necklaces and picked out all the ones that were natural seeds, beads and shells to complete the look. When the wind goes through it you can hear them all rattle.  I attached everything with wire and screws and then used e6000 glue on top of that to make sure it would all stay as it will be used outdoors. I hung it on our back fence the night a big storm was coming through to make sure it would all stay put and it made the test!